Walk Cycles for
Animals - Page 2
by: Timothy James Lundberg (
lundber6@pilot.msu.edu)
Once Layout is open, import of all of the body parts and make sure that everything is there. The first thing to do is to set the rotation points of all the body parts. You set the rotation points by using the "Move Pivot Pt". Also create 4 Nulls, name them RightFrontFootNull, LeftFrontFootNull, RightRearFootNull, and LeftRearFootNull. Set the rotation points as follows. Set the position of the Nulls, rather then the rotation points, and remember to make a key frame when you do enter the values.
|
X-Position
|
Y-Position
|
Z-Position
|
|
| Head |
0
|
.44
|
-.3075
|
| Neck |
-.00018627
|
.335
|
-.2475
|
| Chest |
0
|
.33
|
.005
|
| Hips |
0
|
.33
|
.035
|
| LeftFrontFoot |
.1275
|
.07
|
-.17
|
| LeftFrontShin |
.1275
|
.2
|
-.1175
|
| LeftFrontThigh |
.1275
|
.3475
|
-.2075
|
| LeftRearFoot |
.1275
|
.07
|
.1825
|
| LeftRearShin |
.1275
|
.2
|
.1175
|
| LeftRearThigh |
.1275
|
.3475
|
.205
|
| RightFrontFoot |
-.1275
|
.07
|
-.17
|
| RightFrontShin |
-.1275
|
.2
|
-.1175
|
| RightFrontThigh |
-.1275
|
.3475
|
-.2075
|
| RightRearFoot |
-.1275
|
.07
|
.1825
|
| RightRearShin |
-.1275
|
.2
|
.1175
|
| RightRearThigh |
-.1275
|
.3475
|
.205
|
| LeftFrontFootNull |
.1275
|
.07
|
-.17
|
| LeftRearFootNull |
.1275
|
.07
|
.1825
|
| RightFrontFootNull |
-.1275
|
.07
|
-.17
|
| RightRearFootNull |
-.1275
|
.07
|
.1825
|
Now we set up the heirarchy. The hierarchy is as follows; foot null to shin (I.E. RightRearFootNull is parented to the Right Rear Shin), shin to thigh, thigh to chest/hips, head to neck, neck to chest. The feet are not parented to anything right now, but they will be. Create 4 nulls, name them God_Null, Forward_Null, UpDown_Null, and Spine_Null. The reason for theses four Nulls is for movement. Because of Layouts current lack of a good scene editor it is better to create nulls for certain movements. In this case The UPDown_Null is in control of all the vertical movements that the hips and chest might make. The ForwardNull is for forward movement of the torso. The God_Null is normally not moved at all, this is what you use to resize the entire cat and animation, to change the rotation, or starting position for the entire cat mech. Parent the hips and the chest to the Spine_Null, the Spine_Null to the UpDown_Null, the UpDown_Null to the Forward_Null and the Forward_Null to the God_Null. Also parent all four feet to the God_Null. Then choose each of the Foot Nulls, go to the IK info options and set the IK goal to the respective foot (I.E. LeftFrontFoot -Null's IK Goal would be LeftFrontFoot). Check "Full Time IK", set the goal strength to 20 and make shure that on the chest and the hip you check "Unaffected by descendents". That should be all of the parenting and IK, now finally were going on to animating.
Before you start animating I find it helpful to turn of axis movment for objects that are only going to be rotated, not actually moved. For example, have MOVE highlighted on the LeftRearShin, you see that X,Y,Z are highlighted with a yellow glow. Click on them to turn them off, now you can not move the object along any of these axis', buy you can still rotate it. Also make sure "Auto Key Adjust" is not highlighted.
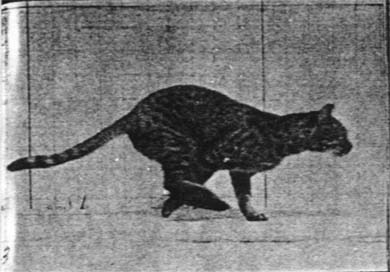
Ok, now on to animating. First I would suggest saving all the objects, and saving the scene. It is helpful to have a version with just the IK set up and no animations. That way if you do something later on, you always have a version to fall back on. Also play around with the body parts, see how they move with the IK set how it is, learn how the model is going to move. The source I used for my animation is these series of pictures.
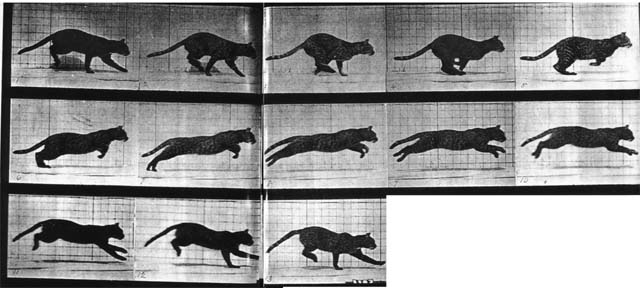
It is from a Moenbridge animation book, these are an excellent source for animal and human animation. This is a 13 frame loop. Basically you try to duplicate the pose in each picture. The key things to notice are the hips, chest, neck, head and the feet. In each frame you want to see the position of the feet, and the height and angle of the hips and chest. When I did this animation, i did a single loop over 26 frames. I would suggest printing the above image and using it as a reference while your animating, rather then switching between programs. Also go into the Perspective camera, and move to the side of the cat mech so it looks like the picture below. From now on I will refer to body parts with abbreviations, example RightFrontFoot = RFF, LeftRearShin = LRS.
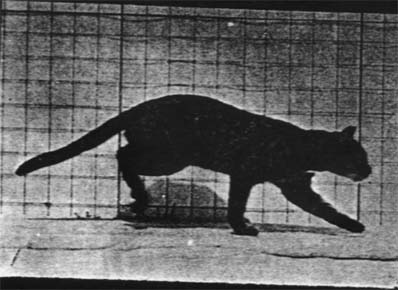
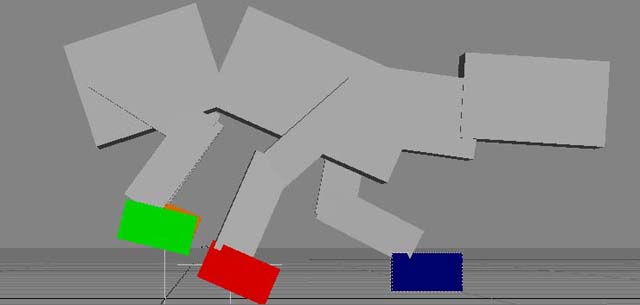
Now for the first frame, make certain that you are at frame 0. The above image will be our reference, remember to make a key frame for each object that you move. For now only move the any of the nulls or body parts in the Y/Z plane, we will go back and adjust things along the X-axis later. Move the body parts around until you get a pose similar to the one the cat has in the picture. Notice how the back legs are bent together with the paws are tilted and how the hips are above the head. This is the pose that I have the mech model taking.
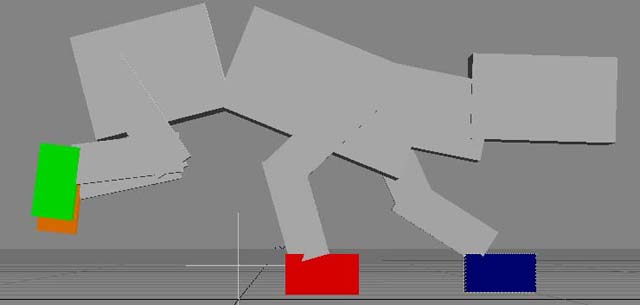
The UpDown_Null is moved up slightly to 5.25 cm, this is to ensure that the hips are above the head. Now go to frame 1 and create a keyframe for all objects. This makes it so that frame 0 is not part of the animation, and sometimes you may want to insert other frames of animation at the beginning, this makes it easier to do. Now go to frame 3 and make a copy of this next pose.
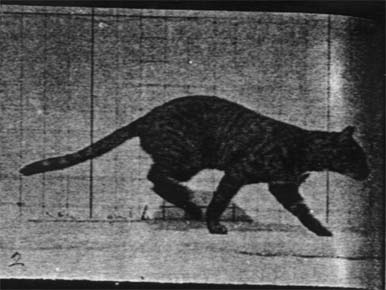
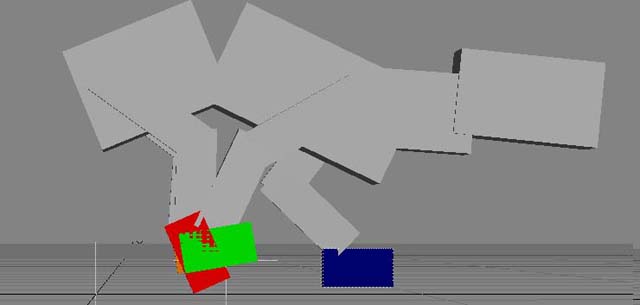
If you notice the darker straight vertical lines in the background of the picture that is for reference as to how far forward the cat has moved forward. Look at the back feet, they are getting ready to land. The Forward_Null is moved forward to -10 cm. Below is the pose that I have for this frame.
The biggest thing is the FRF is slightly tilted and moved up. Now move to frame 5, remembering to make keyframes for all objects.
The back feet are in front of the FRF and the FRF is at the instance of leaving the ground. For now do not worry about body parts going through other parts, we will fix that later. Also look how the cat is contracting, in preparation for the spring, the Hips and Chest are both rotated down.
Its not the clearest but you can see the back feet passing the FRF and preparing to land. The back feet are both tilted up to make them contacting the ground more realistic. The Forward_Null is moved ahead to -20 cm. Now move to frame 7.
Go To Page 3

