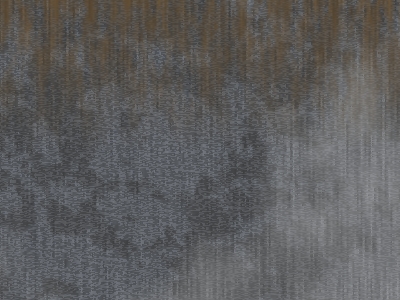
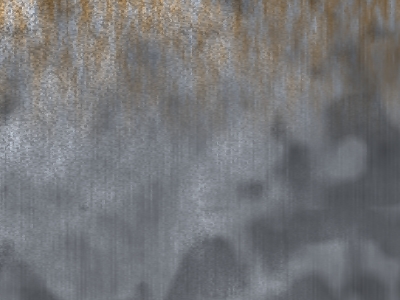
Well, with a little good will this could pass as a concrete wall ;-) If you look at the image you can see a few layers of fractal noise in this surface: The brown stains at the top, the tiny pattern simulating small bumps, the vertical streaks simulating casting in wood molds, and various shades created with two additional fractal layers.
Wait! The idiot stacked this all to the color channel's layers?
Yes I did, but it was solely for educational purposes ;-)
Ok, this should be divided to more channels, really. So far we have only messed around with the color channel. That's about to change now.
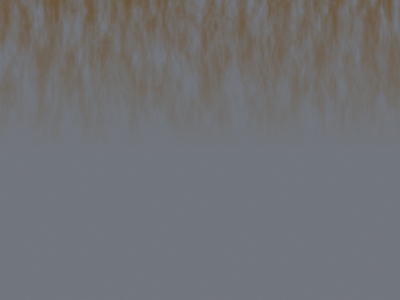
First, the only layer that really alters the COLOR of the surface is the "stains" layer. Let's get rid of all the other ones, and render a sample:
Hint! You can create stains and weathering with fractal noise! And Falloff is your friend!
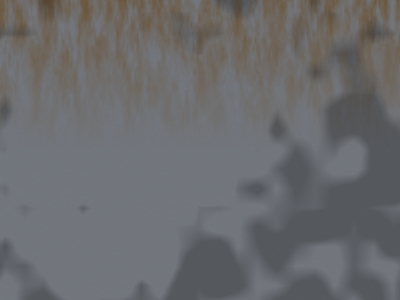
Note how the surface is stretched a bit in the Y axis, and some texture falloff is applied. There were two diffrently contrasted / sized noise patterns to break the surface up a bit. This time, lets put them to DIFFUSE texture. As you can see, there's a new setting in the fractal noise panel.

The texture VALUE setting sets the current parameter to a given value when the procedural texture is fully opaque.
Whoa - what a sentence -
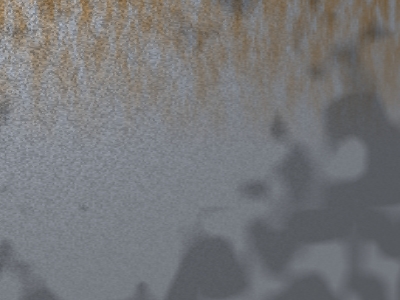
Hmmm... think of it this way: the texture value is the same thing as texture color was in the color channel. If you had a red noise there, the surface blended the original color and red, didn't it? This time the blending happens between the value that was input for the surface parameter (In our case 100% diffuse) and the texture value (75% here).
So, the above texture should darken our concrete up to 75% of the original brightness, depending on the pattern:
And that's exactly what it did. The same thing could have been as easily put directly to the color channel (A new, black noise layer with 50% transparency), and the result would have been exactly (AFAIK) the same, but this way the overall hue of the surface (Surface color) can be changed without re-coloring all the texture layers.
Next let's add some small specular texture noise - this will simulate the roughness of the surface:
Ok, and then some bumps to simulate the wood mold pattern: (I added another, bigger scale layer to randomize everything a bit...)
Well, it's better, but not super - will do for these purposes ;-) The Fractal bumps have only two settings, (Apart from size etc.) Amplitude and Frequencies. As we are already familiar with the frequencies, there's only one thing to learn: amplitude, and it is pretty much self-explanatory, it controls the "depth" or "strenght" of the bumps.

Hint! Remember, that even the "not-so-perfect" surfaces will come to life when combined to other objects, and proper lighting!
Hint! If you have read my "The Great Outdoors" tutorial, you already know how to make semi-realistic clouds with fractal noise.
Hint! Fractal noise can enhance almost any surface,
giving it some randomness - as long as it is used wisely and with style.
Okay, this is it for now.
Next time we will look at the other procedural textures Lightwave has to offer. Until then - keep on tweaking those settings! You can texture EVERYTHING with fractal noise ;-)
Class dismissed!
Happy waving! Be careful out there!
If you have questions about this or other tutorials of mine (Or if you just wanna say hello!), feel free to E-mail me:
Any feedback is welcome. Also
visit
my site!

|
Product Info |
Ordering Info |
Support and Downloads |
Articles and Tutorials |
LightWave Mailing List Contest |
Mailing List Archives & Info |
LightWave Mailing List FAQ |
Other Interesting Web Sites |
