Figure 4.
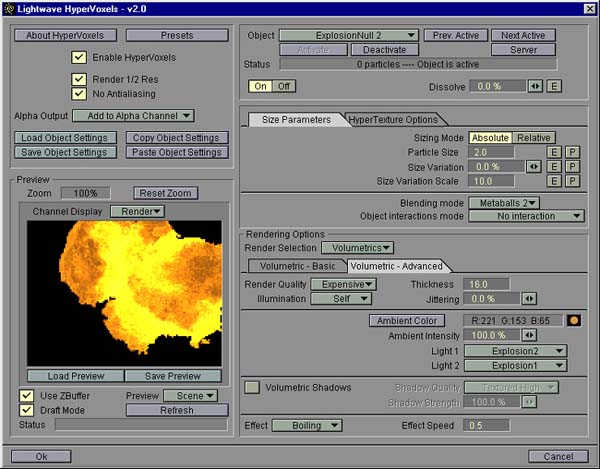
18. - While 'ExplosionNull 1' is still selected, press the 'Copy Object Settings' button in the upper left portion of the window. Now select the 'ExplosionNull 2' object and press the 'Paste Object Setting' button. Just to have symmetry, set Light 1 to Explosion2 and Light 2 to Explosion1 in the Volumetric - Advanced tab. Lets see the complete scene. In the Preview list, select Scene. This will render all active objects. Press the Render button, and something similar to figure 4 should appear.
Figure 4.
Now that is hot. It is actually too hot. This type of explosion does not have that much yellow. Let's try to correct that.
19. - In the Volumetrics - Basic tab, open the Color gradient by pressing the button labeled 'P'. The current gradient looks like figure 5.
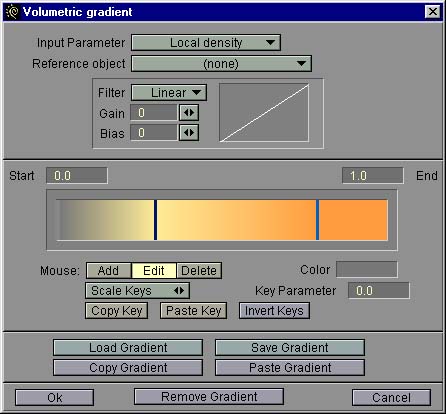
Figure 5.
This window shows how the color changes as the density changes inside the HyperVoxel object (because Local Density is selected in the Input parameter list). We want to have less yellow. One way to do that is to narrow the density band that produces the yellow color. With Edit selected as the Mouse action, click on the line in the orange area and drag it to the left until it is very near the line in the yellow area as in figure 6.
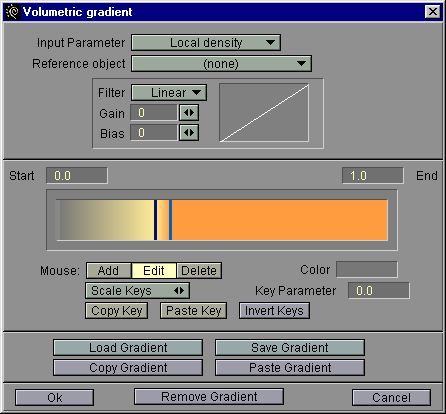
Figure 6.
Close the gradient window and make a preview render. With any luck, you have something resembling figure 7.
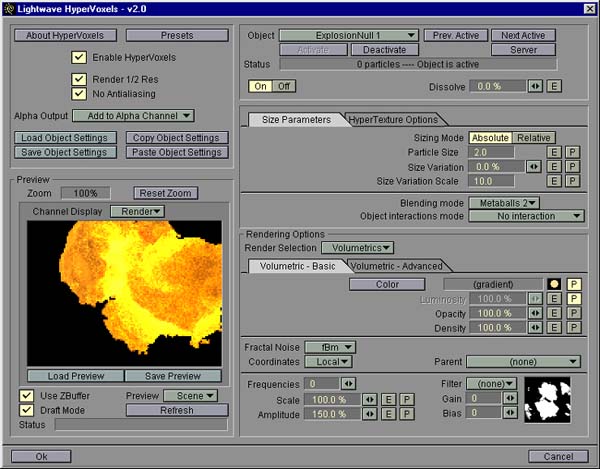
Figure 7.
Compare it to figure 4. Some of the yellow is out, and we have more texture in the brightest areas.
Now, close the HyperVoxels interface and set the time slider to 50 which is the end of the animation. Re-enter HyperVoxels and render a preview. As shown in figure 8, the explosion is beginning to cool off, and some darker smoke has formed as shown in figure 8.
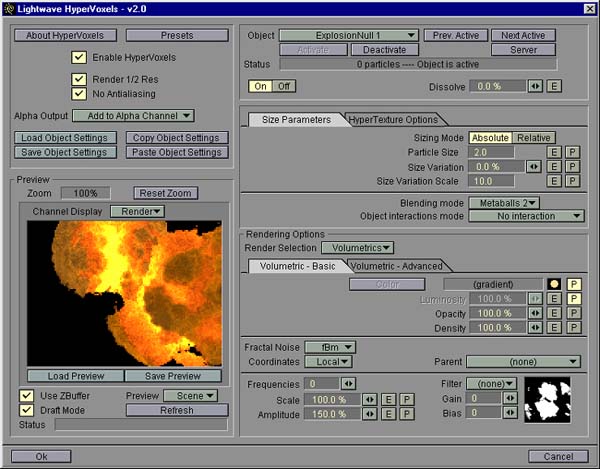
Figure 8.
Exit the HyperVoxels interface and render the animation.
I had envisioned this explosion a bit more dramatic with the fire eventually filling the frame. To do that, let's add a third object. This will be some flames born in the second explotion at frame 14. This element will travel towards the camera with greater speed than the two other objects.
20. - Open the Objects panel and make 'ExplosionNull 2' the current object. Clone this object and Save it as 'ExplosionNull 3'. Exit the objects panel and open the Lights panel. Clone the Explosion1 light and rename it to Explosion3. Since this third element will be born on frame 14, open the intensity envelope and shift all keyframes 9 frames. Now, since the Explosion2 light already has a flare at frame 14, we can disable flare for this new light. Exit the Lights panel and parent the Explosion3 light to the 'ExplosionNull 3' object.
21. - Lets animate the new object. Initially, place it at x = 0, z = 0 and y = -50 cm. Repeat these values for a new keyframe at frame 14 and make this frame linear in the Spline Controls panel. Delete the keyframes at frames 6 and 10 that we inherited from the old object. Go to frame 50 which is allready a keyframe and set the position to x = 64 cm, y = -57 cm and z = -2.5 m. This will make the new object travel from behind, below and through the first two objects and end up quite close to the camera. Finally, set the size at frame 50 to 2.4 on all axes.
22.- Enter the HyperVoxels interface again and notice that the HyperVoxels parameters have been copied to our new object, too. Go to the Volumetric - Advanced tab and set Explosion3 as the only light. This will prevent our new object from being too bright.
Now render he animation, and you'll have a hot, dynamic explosion that ends up as an inferno of fire coming towards the camera.
As you may see in the final rendered animation, there are still much yellow at certain phases in the explosion. If you want to, you may experiment with holding this down doing one or more of the following:
To set up the explosion, I animated the crash and subsequent secondary crashes as the ship is hurdled from wall to wall a couple of times. Then, when I decided when I wanted the explosion to happen, I placed the null objects at the location where the ship would be at that time. I would like to stress here that before you start rendering HyperVoxels stuff you want to get the total animation right with all the other pieces, the ship, pieces of the ship that is torn off during the crash and other debris action. Get this right first because after the HyperVoxels start rendering, it will be difficult to see what is really happening with the other objects.
One difficulty I had with the stationary null objects was that at some specific time, the camera passed right through one of them, and even though the size of that null was zero, it stopped the rendering dead (almost). It is possible to render with the camera inside a HyperVoxel. This is great for fly-through etc., but it takes an incredibly long time. This also seems to be a problem even if the HyperVoxel does not render due to its null object being of zero size. So what I had to do was to move that specific null out of the way until after the camera had passed. Then I moved it to where it should be, and the explosion went on as described.
There was another problem. You may have noticed that all the movements in the explosion were quite small. The longest distance traveled by any null object is about 2.5 meters. The HyperVoxel elements are accordingly small. There is a reason for this.
I started this project by building the corridor and ship models and
did the animation. The models were built to scale. Then I started
experimenting with the HyperVoxel stuff. I found that to match the
size of the models, i either had to set the Size in the HyperVoxel interface
to a rather large number, or I had to size up the null objects quite much.
Either way I just could not get the Voxels to look right. At that
time, there was a thread on the LW Mailing List that taught me that HyperVoxels
like to be around 1 to 2 in size (in the HV interface) and they like to
be used on reasonably sized null objects. Because of this, I decided
to shrink my set to match the requirements of the HyperVoxels. So
I created a null object that I called 'SCALE NULL' and I parented all objects
and lights to this null except for the HyperVoxels nulls and their lights.
By scaling down this null, I managed to scale down the whole set and the
lights in one go. The only thing that needed to be adjusted was the
Limited Range values of the lights. After I had scaled the set to
mach the Voxels, the Voxels decided to be nice to me.
That was that. I hope you learned something from all this.
As with every Lightwave thing, there are probably one hundred other ways
to do this, and the explosion may be adjusted forever for different effects.
Hopefully this gave you a starting point to use when exploring the vast
possibilities of the HyperVoxels plugin.
You can reach Morten Moen by sending e-mail to
mortenaa.moen@c2i.net

|
Product Info |
Ordering Info |
Support and Downloads |
Articles and Tutorials |
LightWave Mailing List Contest |
Mailing List Archives & Info |
LightWave Mailing List FAQ |
Other Interesting Web Sites |
