LIGHTWAVE TUTORIAL

Stringing Your Puppet
- A PuppetMaster tutorial by Patrick Woods

This tutorial is included on TutorVision 3-D CD Volume 2 but is being reprinted here to better serve the LightWave community, since a number of people have been asking for help with PuppetMaster.

PLEASE NOTE: all of the objects and scene files for this tutorial are included on the TutorVision 3-D Volume 2 CD-Rom.     If you would to get these files, then CLICK HERE to place your order for the CD!


Stringing your puppet

The purpose of this tutorial is to illustrate a method of surfacing your characters that will make them easier to work with Fori's super nifty PuppetMaster. As you know PuppetMaster requires two things to function, PuppetSections and a PuppetAnchor. The PuppetSections are basically parts of the Anchor which you cut up and animate as separate objects. Through the beauty of PuppetMaster the movement of these sections translate to the corresponding points in the Anchor and you get an animateable seamless object without all the headaches of bones. The basic process is to model the seamless object and then cut up the polygons which make the arms and legs. This seems simple enough, however there is one problem, the point information of the sections must be the same as the anchor. If you cut up all your sections and then decide that the character needs a belly button for example you have to go back and re-select all the sections and cut them up again. This can get very tedious, and the more you do it, the more you are at risk of making selection errors that can set your work back by a few hours.

The following technique originated in attempts to automate the process of cutting up the sections. I wanted to come up with a way that I could setup the anchor and create a plugin that would cut them all up for me. The question was how to tell the plugin what I wanted to use as sections. The answer is, "Different surface names for every section"! This method would allow the plugin to simply use the surface information to create the sections, and this information would be stored with the anchor. This solves the problems which may arise if I modify the anchor. Now re-cutting the sections would be just a matter of running the plugin. I started setting up all my characters this way. I haven't written a plugin to automate the process yet but I find that this method saves me a lot of time and makes my work much more reliable.

The following steps will guide you in using this method to setup an included sample character (Angryguy). I hope you find it helpful.

Setting up the anchor

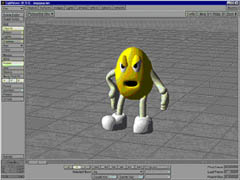
1. Load Angryguy_C.lwo into modeler and turn on metanurbs. ( Figure 1 ). Angryguy_C is setup with basic surface names to give him the appropriate colors for his appearance. These are basic body parts like "Arms", "Legs', "Shoes", etc. These labels allow for the different colors and facilitate editing the object.

We will now proceed to break down these basic surfaces into sub-surfaces which will define the puppet sections for Puppet Master. Figure 2 shows the top, side, and front views of Angryguy_C with the sections in different colors to give you an idea of how the object is to be broken down. You may also load angryPM.lwo into modeler to see exactly how the object is broken down.

2. Let's start breaking down our little friend. We will begin with his left bicep. Go to polygon selection mode. Bring up the statistics panel (w), and select the Arms and Hands surface. ( Figure 3 ). This will highlight his right and left arms and hands.

3. We now need to get rid of everything that is not the bicep. Start by lasso deselecting the right arm and hand. You should now only have selections on the left side.( Figure 4 )

4. Now deselect all the parts that form the hand. You should be left with only the polygons forming the arm.

5. The arm is composed of four sections bicep, elbow, forearm, and wrist.( Figure 5 ) Deselect the wrist, elbow, and forearm. Now you should only have the polygons composing the Left Bicep selected.( Figure 6 ). Bring up the surface requester (q) and call this selection L_bicep. Repeat this process for the elbow and the forearm. We will not be using the wrist polygons as a puppet section so label them "not a section", I'll explain why later.

6. After completing this step you should have polygons with surfaces L_bicep, L_elbow, and L_forearm. Repeat the process for the right arm changing the L_ to R_.

We have now successfully broken down the arms!

7. We will now proceed to break down the legs. Follow the same procedure described for the arms in steps 2-6. this time using the three sections thigh, knee, and calf ( Figure 7 ). All polygons are used in the leg sections.

4. The hands can be the most tedious part of this entire process. If you want to have fully articulated hands you need to have sections for the palm, and every joint of each finger, base, middle, and tip. Angryguy is a very simple object so his fingers only have two joints, base and tip.( Figure 8 ) This can be very tedious but it really pays off. If you don't need fingers that move you could just create a section called "hand".

5. The shoes should be broken down into two sections toe and heel.( Figure 9 )

We should now have the arms, hands, legs, and shoes broken down into their respective sub surfaces. Since the main body has so many different surfaces, we will leave it alone. We now have an anchor object ready for easy section cutting.

6. Save this version and use it to do any modifications you wish to do with the anchor.

Now you will never have to re-select the polygons in order to cut them up into sections. Ideally you want to name these surfaces as you construct the object, so that you will have an object ready for sectioning as soon as you finish modeling.

Making the sections.

Now that we have our anchor object labeled and ready to go, it is time to start making our sections. This process consists of using the statistics panel to go through our surfaces and cut and paste them.

1. Let's start by setting up modeler to make this as easy as possible. Place the anchor object in the first layer and make the second layer your background layer. Turn off metanurbs. Layout does not recognize metanurb objects so we have to make sure that our sections are polygons. However, metanurbs mode makes naming the surfaces much easier in the first part .

2. Let's do the main body first. Since the body is composed of many different surfaces, the body requires the most thought (though not much). Bring up the statistics requester and select, "body", "eyes", "innermouth", "mouth", "lids", "lowerlids", and "pupils". Cut this selection (x), switch to the background layer ( ' ), and paste(v). You should now have the body and eyes in the background layer.( Figure 10 )

3. Choose "Save Object as" (S) and save it as "body.lwo" in a new directory, I like calling it "Puppet". Hit undo(u) twice once to clear the paste and once to clear the cut, this is important to maintain the point information.

PuppetMaster works exclusively with point information. You could actually make your sections entirely out of points. That is why we do not need to use the wrist as a section, PuppetMaster will automagically stitch the palm to the forearm creating the wrist. This gives us some flexibility when creating our sections. However, letting PuppetMaster stitch together major joints like the elbow, can create a very rubber hose like effect and make the character appear to have no volume. Experiment and see what you like best.

4. Now, switch layers back to the first layer. Proceed to the next section.

5. Bring up the statistics panel again. If you are using 5.5 at this point just leave it open, it will save you a keystroke every time. Select L_bicep and do a quick cut, paste ( Figure 11 ), save as, undo, undo, layer switch.

Proceed with this process until you have objects for every section in the puppet directory. This can be very boring but with all the sections pre-determined you can just very quickly go through the keyboard shortcuts without really thinking about it. I hope to eventually write an Lscript (for 5.5 users), that will perform this step automatically to realize this technique's full time saving potential.

4. Now that we have all of our sections, copy Angryguy_C.lwo into the "Puppet" directory and fire up layout.

In layout the first thing we want to do is go into the "Options" panel, and go to "Generic Plugins". Select "PuppetMaker_BATCH"( Figure 12 ). When it prompts you to "load anchor object" use the arrow on the right side to bring up the file requester. Navigate to your "Puppet" directory and select "Angryguy_C.lwo". Lightwave should then tell you that "All puppet sections in this directory have been made. Close the panel and your done".( Figure 13 ) Do as it says and close the panels. If you look in your "Puppet" directory you will notice that there is a ".sec" file for all the objects except for the one you used as the anchor. If you ever re-cut your sections all you have to do is erase the ".sec" files and re-run "PuppetMaker_BATCH".

You are now ready to use PuppetMaster. Load all of your objects into layout making sure that you load "Angryguy_C.lwo", your anchor, last. Go to the "Objects" panel and apply the Displacement Map Plugin "PuppetSection" to all of the sections ( Figure 14 ), and apply the Displacement plugin "PuppetAnchor" to "Angryguy_C.lwo". ( Figure 15 ) Place your pivot points in the correct locations and animate away. For better results I recommend loading up "Angryguy_M.lwo" and setting up metamation.

Good luck and Happy Puppetering.


Product
Info
Ordering
Info
Support
and
Downloads
Articles
and
Tutorials
LightWave
Mailing List
Contest
Mailing List
Archives
& Info
LightWave
Mailing List
FAQ
Other
Interesting
Web Sites