(The fastest way is to render the BG surface's test sphere, select FG surface and click the sample ball - thus copying the surface - then you just need to auto size the texture.)
Load the Woods_mask image. Go back to the FG color texture, and copy it [Ctrl C] to the transparency channel. Replace the transparency texture image with Woods_mask.iff.
In older versions of Lightwave you have to copy the surface attributes manually.
Now it's a good time to tell you that all the surfaces I used here can be found in the surfaces folder of the ZIP file, as well as the objects (W/O textures) and the scene file.
F9
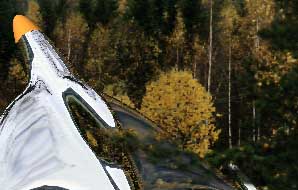
As you can see, the Craft is now behind the tree.
As we modeled the FG and BG plates by scaling the same object relative to 0,0,0, all auto sized textures in the planes align automatically and perfectly when the camera is not moved from 0,0,0. Again, the smart ones noticed that one can have infinite amount of these differently masked planes in a scene - so that you can move in front or behind any part of your BG image easily - and in 3D.
This is the first reason why we didn't use LW's basic image compositing this time. The other one is quite obvious - let's see do you guess it before I explain it ;-)
Also notice, that even though our mask is a rough one, it does it's job adequately in this scene.
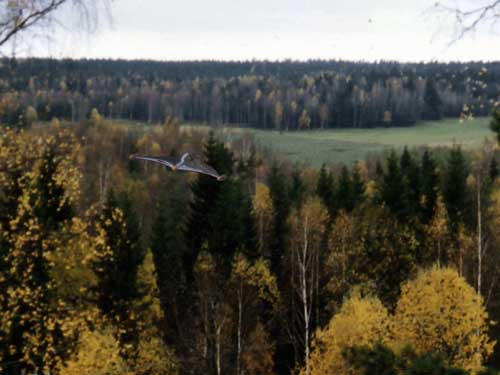
First lets make a motion for our craft. Hide (In the scene editor) the FG object so we can see our ship again. Give the ship a cool motion (I made it fly in from the right side of the image, and then turn and fly off to the horizon)
As the object is modeled in positive Z axis, i used align to path to conform the heading and pitch to the motion path (Graph editor) I also used 10 frame look ahead.
Furthermore, I set up a basic blue-gray fog to give Craft some aerial perspective. I set the FG and BG Objects unaffected by fog.
And now for the BIG BONUS of this method of compositing. You can add camera pans and tilts, as well as zooms to your scene. As the BG image is quite hi rez, I could zoom in the Picture, and actually follow the ship with LW camera, with my FG and BG perfectly aligned. Also, when the camera is panned, you get correct motion blurring in the BG and FG images!
This is just 2 1/2 D though... the camera can not MOVE at all - it would cause the plates cease to align correctly - the objects can naturally move in full 3D.
Here's an still render and an AVI file of this scene.
So, what have we learned so far?
* That using the background plate as is as an
reflection
map (Especially when doing outdoor scenes) works surprisingly well
* A new method for compositing images in combined
2-3D virtual space.
* That using high image resolution is usually
more important than millions of colors ;-)
* That the mask and the foreground image don't
have to be the same resolution
* That sometimes you can get away with not-too-accurate
masks, especially when there's fast motion involved
* Having some foreground in composites helps
to establish the size of rendered objects
* Being able to tilt and pan the camera brings
still backgrounds to life
* That it's good that i'm not an aircraft designer...
And hopefully some more ;-)
In the next part of these tutorials we will create a bit more elegant and accurate reflection mapping, as well as search for ways to further incorporate rendered objects to real footage.
Remember the christmas ball again?
I have some homework for you... Go and buy yourself
a chrome ball (Christmas ball will work ok) and also a white ping pong
ball.
I'm dead serious - these will be needed in the next part! Try to figure out how... remember - the chrome ball reflects everything - which can be used for our advantage too ;-)
But what the heck do we need the ping pong ball
for?
And how come there's not a LW cow in sight here
in this beautiful rural scene?
Happy waving! Be careful out there!
If you have questions about this or other tutorials of mine (Or if you just wanna say hello!), feel free to E-mail me:
Any feedback is welcome. Also visit my site! http://www.kolumbus.fi/erkki.halkka/

|
Product Info |
Ordering Info |
Support and Downloads |
Articles and Tutorials |
LightWave Mailing List Contest |
Mailing List Archives & Info |
LightWave Mailing List FAQ |
Other Interesting Web Sites |
