Hello folks. Today we will study a simple process (Or two), that will allow faking camera movement with chroma key footage.
Why? - You ask - why not just get a track in the studio, there's no need to fake anything?
Well, moving camera and chroma key mean more work in the post. It's quite hard to mimic the movements of the camera in a 3D or 2D app... (And quite impossible to try to actually shoot the background with same movements) Using motion tracking software would mean placing markers in the screen, and having to mask them out in the post. Also, it's usually not as automated a process as it may seem, many times the motion path needs tweaking by hand etc.
Furthermore, the Ultimatte Screen Correction, the "magic" part of Ultimatte, doesn't work if the camera moves. (Unless of course you use a motion control rig, but that's out of our league this time ;-) We were talking about a simple and fast process, remember...
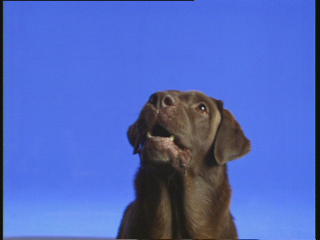
Here's a shot of ROMMI (Rum) the dog, shot against blue screen for our company ident. (The only chroma shot I already had in my HD, but not a bad choice... I will link to it when we put it online ;-)
(None of the pieces of footage in this tut were originally designed to be composited together, and there is some bad lighting continuity regarding the comps here later on etc., sorry ;-)
Woof!
As you can see, the chroma is far from perfect... it's too bright in the bottom etc. Normally this would mean a bad key. I'm getting lazy shooting blue screen nowdays, as i know that I really CAN fix almost everything in the mix. I must say that I truly dig Ultimatte software ;-)
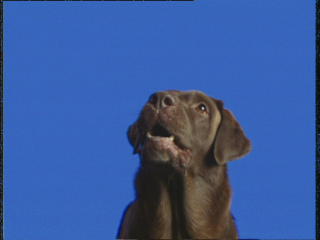
This is a screen corrected version of the same shot. Notice, that the background is now evenly lit. If you don't own Ultimatte, don't worry, this is the way it should have been shot in the first place ,-)
But back on topic:
Rommi was shot with a fixed camera. To ensure NO movement of the camera, it was placed on a tripod, and all the screws were tightly secured. The operator (That would be me ;-) didn't touch the camera at all while it was running.
The light setup was just one 2 kW tungsten light reflected from a white screen in the right side, and some really minimal (Like 5% of the key light) fill light from left.
When the foreground was satisfactorily lit, we added two floods to light the blue screen. We were lucky to have big enough stage, there was something like 10 meters from Rommi to the screen - that way we could have a truly separate foreground lighting.
Ok. Now we have the freaking dog shot - what about the movement?
First of all, we must be kind to animals (No dogs were harmed during this production), and I will not tolerate such a violent attitude!
Hehe... It is really simple, as promised.
Take a look at the two images below:
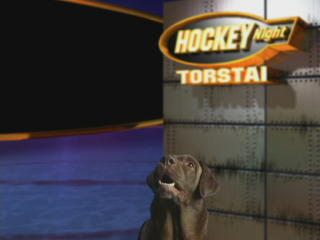
These are the beginning and end of our first, "track in" shot. I composited these in After Effects, but any decent composition app will do, including Premiere, Speed Razor etc.
If we analyze these a little, the trick is easily explained. There's only two layers, Rommi (keyed FG) and an early test still frame (Lightwave) from our company's weekly National Ice Hockey League show's virtual set (BG).
(Produced for MTV3 Finland)
What I've done, is that I just created a keyframe for "Rommi" layer in the first frame, and reduced it's size to 30% or something. In the last frame, it's 100% size.
Enlarging images too much introduces softness and jaggies and whatever... With a decent app you can often scale footage to about 110-120% size or something without too noticeable artifacts. If possible, try to scale down your layers, rather than enlarge them. So, shoot as tight a shot as you dare (The subject shouldn't move outside the frame of course), and don't worry about the comp. It can be changed later!
When shooting standing people, you can even put the camera sideways to have more space for the talent - images can always be rotated in the post!
(With that said, I often scale comps to the mentioned 110%, and move or rotate them just a little to give them some life)
The BG image was rendered 2X video resolution, and has a similar scaling key frames as Rommi - but the movement is slower.
Rule of thumb:
The closer an object is to your moving camera, the faster it will move, scale etc.
The further away it is - the slower the motion.
So, when Rommi was scaled from 30 to 100%, the background was scaled from 75% to 100%
(About)
Here's an animated gif:
(If you have read this carefully, it should have loaded already.
Oh, BTW, digitized video footage tends to have some black blanking stuff around the edges - just crop it out!
One thing that adds to the realizm in this shot is that the background blurs more as the camera tracks in. I added two keyframes for gaussian blur for the BG layer, like 2% in the beginning, and 10% or so in the end:
This was in order to fake Depth Of Field, as the focus of the camera is fixed on Rommi, and when the camera "moves closer" the focus racks from like "2 meters" to "1 meter" - which in real life would cause the background to blur more towards the end.
The smart animators just realized that this is the same effect that's often used to fake DOF in composited animations too ;-)
The next gif is a camera track from left to right:
The same principles as above apply to this too:
* The original BG image is bigger than the output resolution. It's moving slowly as it's far away, and is just a bit out of focus - blurred w. gaussian blur.
* The keyed Rommi is sized 100%, and is moving faster than the BG as it's closer.
* There's a third layer, which is an alpha-keyed graphic element, that is heavily blurred (So, hey, it's close to the camera) and it's moving fast.
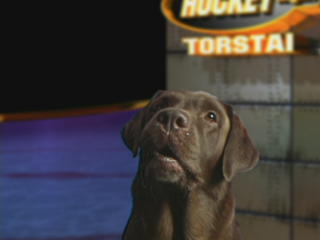
Here's a bit bigger grab of the shot:
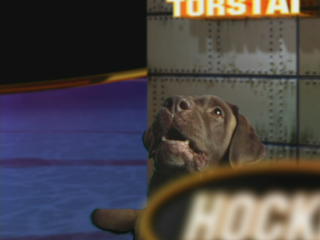
I should maybe have moved the BG layer a tiny bit faster, it looks a little out of place - but hey - these were the first test comps, and were made FAST! (It took about half an hour to create all the examples)
This technique can also be used to create a camera circling around the talent. (Hehe, be grateful, a few years ago this trick was our company's trade secret, and was used in semi-high profile music videos etc.
(well, semi-high in terms of Finnish artists ;-)
It goes like this:
When shooting the blue screen, put the talent standing on a turntable. Don't show the ground - the feet won't ever align perfectly...
Then shoot him/her doing the act, turning around.
Next just create a rotating BG camera movement (this can be an actually shot 360 degree pan, timed to match the turntable's rotation, a 3D background pan animation, or a wide still image moved like in the above example.)
Now comp these two together. If the talent rotates clockwise, have the background moving from left to right. (A counterclockwise pan)
You can also add foreground elements, like in the above example, but these should move in the OPPOSITE direction compared to the background.
When the talent rotates in front of the blue screen,
the lights naturally won't rotate with him/her. This is not as visible
in the final image, as one would suspect - the strong motion draws the
attention.
Next we will check
out a 3D implementation of these techniques.
Support Our Sponsors!

|
Product Info |
Ordering Info |
Support and Downloads |
Articles and Tutorials |
LightWave Mailing List Contest |
Mailing List Archives & Info |
LightWave Mailing List FAQ |
Other Interesting Web Sites |
