
Hypervoxels 2 is the new volumetric rendering engine from Newtek. It makes it possible to produce very realistic fire, explosions, smoke, clouds etc. Hypervoxels 1 was included with Lightwave version 5.6, and HV2 is sold as a separate plugin. From what I hear, Lightwave 6.0 will contain HV2 as well.
This tutorial will deal with making a fiery explosion, like this one:
If you would like to see the animated shot that this explosion was used in, check out this animation! (287k)
I wanted to develop a scene where a spaceship crashes in a space station corridor, gets hurdled into the corridor walls a couple of times before it explodes in an inferno of flames travelling towards the camera. Since this is a HyperVoxels tutorial, I will not discuss the ship and space station, but rather concentrate on the inferno of fire.
I wanted an explosion that gave birth to a wall of flames that comes
rushing towards the camera. Lets give it a try.
1. - Open Layout and Add Null Object from the Objects panel.
Save Object and give it the name ExplosionNull 1.
2. - In the first Displacement Plugin slot, choose LW_HyperVoxel_Paricle and close the Objects panel.
3. - Open the Effects panel, and in the first Pixel Filter slot, select LW_HyperVoxels. In the second slot select LW_HyperVoxels_Doubler.
4. - Press the Options button for the HyperVoxels plugin in the first slot and prepare for a bit of experimentation.
The HyperVoxels interface has quite a number of parameters. The documentation that comes with HyperVoxels explains them pretty well, but from that to mastering them all and making them produce what you want requires some experimentation.
5. - First of all, enable the Enale HyperVoxels, Render 1/2 Res and No Antialiasing buttons. Then, in the Object drop down list, select our only object, ExplosionNull 1 and press the activate button. A pop-up window will display saying that the object was found. In the 'Size Parameters' tab, press the 'Absolute' button and set the 'Particle Size' to 2. Press the Refresh button, and after a few seconds you will have a nice red ball in the preview window as shown in figure 1.
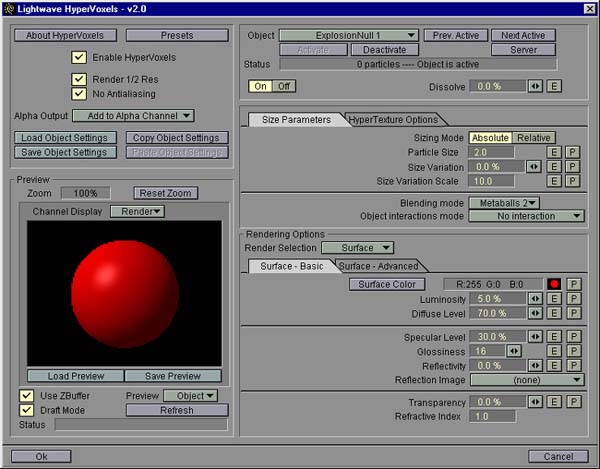
Figure 1.
This does not look very much like an explosion, but there are so many parameters to set, so chances are that after a couple of weeks we may stumble onto something usefull. Then there are the Presets. Newtek shipped a number of usefull presets with the plugin that may be used as starting points for generating the effect you are after.
6. - At the top of the HyperVoxels screen, press the 'Presets' button. This brings up the presets window. Press the 'Volumetrics' tab and take a look at what it offers. This is definately looking better. A nice collection of flames and clouds and dust and stuff. Press the last preset on the page called Billowing Fireball and press OK. When you hit the 'Refresh' button, you should get a nice explosion like figure 2.
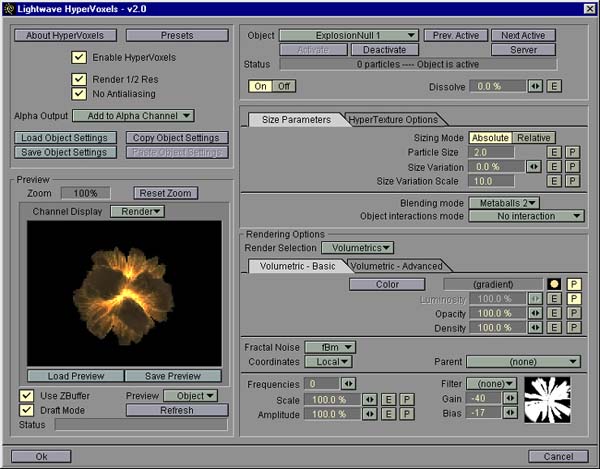
Figure 2
Now for a litle animation.
7. - Close the HyperVoxels window. The scene now has one light in the default Distant Light configuration. When I add my explosion to a scene, i want the fire to actually light up my set. To make this happen, parent the light to the ExplodeNull 1 object and set the position of the light to 0, 0, 0. This makes the light be in the same place as the null object. In the Lights panel, turn the light into a Point Light and give ot a falloff of 10 meters. You may have to adjust this when you see the effect on your scene. Set the color of the light to 247, 133, 0. Rename the light 'Explosion1'.
We now want to start timing the explosion. I want to have a few frames of black before anything happens, so I want to start my explosion on frame 6. At this time, two things should happen: The fireball should start to expand, and the light should start to work. Since we're already in the Lights panel, lets start with the light.
8. - Open the envelope panel for light intensity. Set the intensity for frame 0 to 0. Make a keyframe for frame 5 and set the value to 0 there too. Open the Spline Controls for the keyframe at frame 5 and check Linear. Make another keyframe at frame 7 and make the value here 100%. Now make a last keyframe at frame 50 and set the intensity to 20%.
9. - As the explosion goes off, I also want some flare. Enable Lens Flare and open the Lens Flare Options panel. Enable Fade Off Screen, Central Glow, Red Outer Glow and Anamorphic Distortion. Leave everything else off. You may want to leave the Lens Reflections on if you like to. Open the Flare Intensity envelope panel. Set the value for frame 0 to 0. Make a new keyframe at frame 5 and set the value to 0. Make frame 5 Linear in the Spline Conrols panel. make a new keyframe at frame 6 and set the value to 350%.
We have now created a bright flare. As the intensity of the flare grows, the size of the flare will grow out from the light source. If we also used the intensity to ramp down the flare, the flare would appear to shrink back, and that is not quite what we want. Instead, we will use the Flare Dissolve envelope for this.
10. - Open the Flare Dissolve envelope and set the value for frame 0 to 0. make a keyframe for frame 6 and set that value to 0 too. As usual, make this frame linear in the Spline Controls panel. Now make another keyframe for frame 8 and set the value to 100%. Close the Flare Options panel and the Lights panel.
That's it for the light. Now for the object.
11. - Make sure 'ExplosionNull 1' is the current object. If you have followed along, this will be your only object. Make a keyframe at frame 0 and make sure the object is positioned at 0,0,0. Also make the size of the object 0 on all axes. Make another keyframe at frame 6 and copy the values from frame 0. make frame 6 Linear in the Spline Controls panel. Now make a keyframe at frame 14 and move the object -60 cm on the Z-axis. Make the size about 4 on all axes. This motion is the initial explosion and subsequent sudden outburst of the fireball. Now make another keyframe at frame 50. Move the object to about - 1 m on the Z-axis and about 20 cm on the Y-axis.
12. - Let's pretend this is for a block-buster feature film, so we want to shoot in wide screen. This should be either 1.85:1 or 2.35:1, but these are cumbersome numbers to work with, so let's invent the new film standard of 2:1. Open the Camera panel and set the width and height to 240x120 or as high as your computer speed will allow without your test renderings taking all day. Finally, position the camera at x = 1.2 m, y = -50 cm, z = -4 m with a heading angle of -21 degrees and a pitch of -4 degrees. Now render the animation and have a look at it.
Well, this is not what I call an exploding wall of fire. Not at all. First of all it's round. My first though was: Let's add another null and sort of stretch this thing out a bit.
13. - Open the Objects panel and clone the 'ExplosionNull 1'. Press Save Object and rename the new object 'ExplosionNull 2'. Select this new object and go to frame 14. There will already be a keyframe at this frame. Delete it and create a new keyframe at frame 10. We want the two nulls to behave differently to avoid a too staged look. At frame 10, position the new object at x = 29 cm, y = 0 cm and z = -52 cm. Make the size 1.2 on all axes. Go to frame 50 where there already is a keyframe. Make the size 3.2 on all axes and set the position to x = 90 cm, y = -35 cm and z = -1.5 m.
14. - Open the lights panel and clone the light, too. Rename it to Explosion2 and parent it to 'ExplosionNull 2'. I wanted to have a second explosion after the first one. Let's use the flare of this new light to do this. The second explosion will occure 9 frames after the first. Enter the Lens Flare panel and shift both envelopes there 9 frames. Close the Flare panel. We also need to make adjustments to the light intensity, but we cannot just shift it 9 frames because we need some light from it for the initial explosion, too. Remember that the second fire object starts growing together with the first one. Enter the Light Intensity envelope and apply a shift of 9 frames only to the keyframe at frame 7.
15. - Render the new animation.
OK, we have an explosion-like thing and it's not round any more. It's better, but an inferno of flames ? No. Definately not. Let's dive into the HyperVoxels interface again and see what we can do.
16. - Drag the time slider to frame 36 so that this is the frame that we will see in the HyperVoxels preview window and enter the HyperVoxels panel again. In the Preview drop-down list, select Object. This way, when we do a preview rendering, only the current object is rendered, and we save some time. Make 'ExplosionNull 1' the current object and press the Refresh button. The preset 'Billowing Fireball' is rendered.
This is where experimentation is the key word. I used several nights adjusting parameters, trying to find an effect that I liked. When doing this, it is important to only change one parameter at a time before watching the difference in the effect. If you change a dozen things at once and then do a preview rendering, you will not know what really caused the effect you are seeing.
17. - In the Volumetric - basic tab, set both Gain and Bias to 0. Leave Scale to 100% and set Amplitude to 150%. In the Volumetric - Advanced tab, set Thickness to 16. The thickness parameter may be used to boost the brightness of the effect. There is one other parameter that I do not like. The Effect drop-down list may be used to set the internal movement of the effect. If it is set to none, the effect is static. I tried this, and it is like having an image of an explosion that is just moved towards the camera. As it is now, the Effect is set to Billowing which gives this rolling effect that you saw in the animation we rendered. I did not really like that. I was after a more boiling wall of fire. Let's see what other types off effects there are. Ah, there is one called Boiling. What a coincident! Select Boiling from the list and set the Effect Speed to 0.5. This works as the speed with which the effect is moving. Now, in the Light1 list, select the Explosion1 light. We also want the other light to influence this object, so select the Explosion2 light as Light 2. Press the Refresh button and see what we have. The HyperVoxels interface should now look something like figure 3.
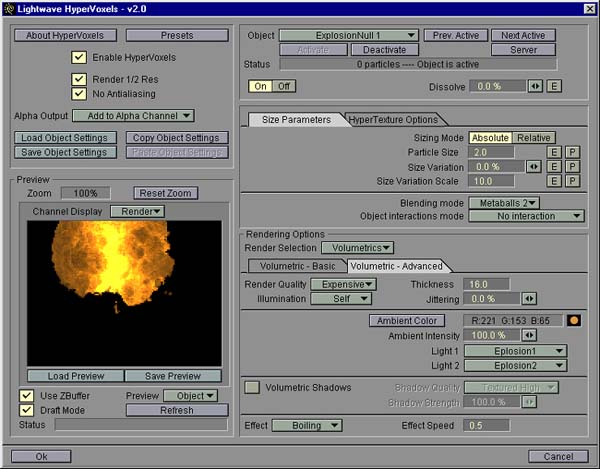
Figure 3.
Now, that's more what I had in mind. Lets set the same parameters
for the other object. This is easy...
Go To Page 2
Support Our Sponsors!
|
Product Info |
Ordering Info |
Support and Downloads |
Articles and Tutorials |
LightWave Mailing List Contest |
Mailing List Archives & Info |
LightWave Mailing List FAQ |
Other Interesting Web Sites |
